A wax try-in of the denture teeth is an important step in the fabricating process. This allows the doctor to confirm fit and function and allows the patient to preview their new smile before it is finished. Using the information provided at the bite rim stage, your denture technician will set the appropriate size, shape and the requested shade of teeth in wax on the base plates. If the patient has large undercuts present, the baseplate may feel loose which may require you to use denture adhesive to assure the correct position of the baseplate for the try in. The fit will be correct after processing.
With the set up’s in place, have your patient smile with their new teeth.
Confirm the patient’s VDO. If you are duplicating a patient’s previous VDO, simply measure the patients VDO with their old dentures and with the wax try in. If you are opening the VDO of a patient whose bitemayhave collapsed due to wear, check how the new set up looks and functions to determine ifthis VDO is comfortable for the patient.
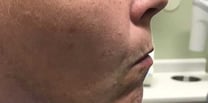
This patient's VDO is too closed
- Check the position of the centrals. Confirm that the upper and lower midlines match. Confirm that the midline falls in the correct place on the patient’s face. If not, mark the correct midline by scoring the wax or writing directly on the denture teeth with a sharpie marker.
- Check the plane of occlusion. If the teeth look slanted to one side you can mark the correct plane of occlusion by drawing a straight line perpendicular to the floor directly on the anterior teeth with a sharpie marker.


This patient's midline and occlusal plane are incorrect.
- Check the height of the upper anterior teeth. You should see no more than 2 mm of gingival tissue above the tooth in a full smile. If the set teeth look too “gummy” or the upper anterior teeth look too low or the lower anterior teeth look to high, your VDO may be too large.
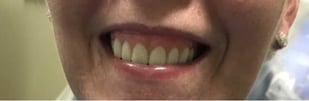
This patient's VDO is too open.
If the occlusion is correct but you are seeing too much gum, score or draw a horizontal line in the wax at the position of the patients lip when smiling. This will show your technician how much to adjust the VDO when resetting the teeth.
Have the patient bite down.
- All the teeth should occlude evenly and the anteriors should display 1 -2 mm of overbite and 1-2mm of over jet.
Note:
- If your patient is a class 2 you will see 3-5 millimeters of overjet and 3-5 mm of overbite.
- Class 3 will have an underbite of however many mm the jaw position requires.
- If your patient is unable to bite down completely, or if the anterior teeth are open, there may be an interference from the posterior teeth or wax. Pop any teeth that are preventing full occlusion out of the upper or lower bite rim. Cut away any additional wax that is interfering. In some cases, it may be necessary to remove some of the base plate covering the tuberosities or the retro molar pads. These will can be added back before processing. Once patient can fully occlude and the anteriors are closed, confirm the VDO and take a check bite directly over the base plates and any remaining teeth being sure your patient is fully and accurately occluded. PVS bite material is best for this. Return the teeth to the lab to be reset.


This patient’s anterior teeth are too open due to posterior interference
- For cast partials, if a clasp or rest is hitting the opposing and causing the bite to be open unnaturally, take an additional bite with the offending partial removed and make a note that the clasp/rest is interfering so the lab can modify it before processing the case.
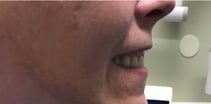
- Check the side profile. Be sure the lips look natural, not too protruded or ditched in. The upper anterior teeth should be flared just slightly to the incisal and the lip should be supported when speaking and smiling. You can correct your patient’s natural overjet by a few millimeters but remember, placing anterior teeth too far back on the ridge can interfere with normal function and due to stress, over time, can cause the front teeth to be knocked out or for the denture to fracture down the middle. Teeth that are not placed correctly on the ridge can also cause your patient to whistle or lisp when speaking.
When the patient can bite, speak and smile comfortably, your dentures are ready to be processed. Make a note of any changes you wish to make in size, shape or shade on the Rx. Note which acrylic shade would look most natural for the patient’s gums. If your technician has requested a wash impression due to recent extractions or a short or distorted model, use light body PVS impression material and be sure the patient is fully and accurately occluded when the impression material is setting. If you are making several changes, it is recommended to try the teeth in wax again before processing and finishing to be sure everything is exactly right.
With the correct measurements, materials and communication, your denture teeth try in will be a successfully completed denture case.
Click here to schedule a consultation with our technical team »