Excellent margins are essential for achieving a well-fitting restoration requiring minimal chair-side adjustments. It is crucial to ensure the margins are designed and prepped correctly, and afterward, it is best to polish your prep. Your choice of margin preparation depends on the type of crown selected for the patient. The types of margins and when to use them are outlined below.
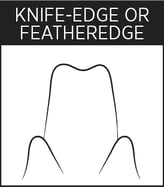
Knife-edge or feather-edge margins are suitable for:
- Full-cast crowns
- Full zirconia crowns
Less tooth reduction is required with a knife-edge or feather-edge margin, but this preparation is less ideal for layered zirconia restorations and may cause fitting issues.
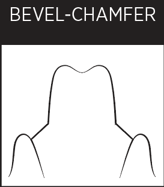
Bevel-chamfer margins are suitable for:
- Full-cast crowns
- Full zirconia crowns
- PFMs
Bevel-chamfer margins offer a better marginal fit, and there is less chance a dark line will be visible at the margin. This margin preparation is not an optimal choice for layered zirconia or IPS e.max crowns.
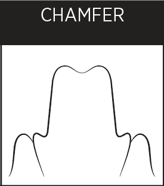
Chamfer margins are suitable for:
- Full-cast crowns
- Full zirconia crowns
Chamfer margins provide a more passive and better marginal fit with no dark margins. They are less suitable for layered zirconia and IPS e.max restorations.
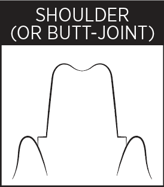
Shoulder or butt-joint margins are suitable for:
- Full-cast crowns
- Full zirconia crowns
- Layered zirconia
- IPS e.max
- LiS2
Shoulder or butt-joint margins provide a more passive fit and eliminate dark margins. This preparation is recommended for LiS2 and layered zirconia. Care must be taken to ensure proper isolation of the margin during preparation.
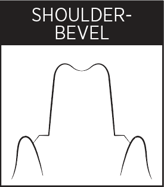
Shoulder-bevel margins are suitable for:
- Full-cast crowns
- Full zirconia crowns
Shoulder-bevel margins help ensure a more passive and good marginal fit, eliminating dark margins. They are not an optimal choice for layered zirconia crowns, and good margin isolation is essential during preparation.
Isolating the margins is critical for a well-fitting crown. If your dental lab cannot see the margins of a conventional impression or if a digital scanner fails to pick up the margins satisfactorily, there is a high risk the case could be delayed, especially if the impression is rejected. Otherwise, if the case goes ahead, it could result in open or short margins. For these reasons, an increasing number of clinicians are choosing to use digital impressions.
Digital technology allows data to be captured and visualized, providing the opportunity to analyze tiny details which are not readily visible on conventional tray impressions.
Achieving an Excellent Margin Scan with Your IOS
Although digital impressions can provide exact images, there are several important factors to consider.
Acquiring an Accurate Sub-Marginal Line of Sight
The image displayed in the mirror is the image that will be captured by the scanner, and ideally, it should show 0.5mm sub-marginally. Dental labs frequently receive digital impressions where moisture and tissue have been inadequately controlled. Although the margin is visible, it isn’t clearly defined. Keep in mind that digital scanners only capture the image that is visible; the traditional impression technique can physically force some soft tissue out of the way, as low viscosity material is injected into the sulcus. Your techniques, when preparing for a digital impression, must allow you to visualize the sub-marginal line of sight clearly.
Retracting Soft Tissue
Retracting soft tissue is best achieved by packing a cord into the sulcus before taking the impression, but this task is often easier said than done. Inflamed gingival will frequently bleed, and isolating the margins is tricky when space is limited. Supragingival margins offer a clearer visualization, but often teeth that are being prepped for a crown will have previously been restored with sub-gingival margins, and the health of the gingival tissues is frequently compromised.
Usually, at least part of the preparation is below the free gingival margin. If your tooth preparation has subgingival margins, the tissue must be separated from the preparation edge, allowing a good quality digital scan. A high-clarity scan is achieved with excellent quality retraction, revealing a clear margin.
Using a Soft Tissue Laser and Retraction Paste to Expose Margins
Using a soft tissue laser can be helpful for exposing sub-gingival margins and for removing unhealthy and inflamed gingival tissue that may be covering the margin or creating excessive bleeding. Removing inflamed tissue also helps to stimulate the regrowth of healthier tissues. After treating areas with a dental laser, peroxide solution removes tissue debris. More moderately inflamed areas can be treated with a retraction paste that helps to provide hemostasis and physical separation between the margin and tissue. The paste is injected into the sulcus, and a firm cotton roll is placed over the paste. The patient bites down on the cotton for between two and five minutes, after which time the paste is rinsed away leaving a clear view of the margin.
Using a Retraction Cord
A retraction cord moves gingival tissue out of the way of the margin preparations and is inserted gently below the gum line and into the gingival sulcus around the tooth. Using a retraction cord can displace gum tissue effectively, however it might also cause bleeding. This bleeding may be tricky to control, making it awkward to capture the margins clearly. Some types of cord are already soaked in a solution of hemodent or can be soaked by the clinician before placement.
It’s also possible to use the double cord technique; using a double cord can enhance tissue displacement, and margins are better defined. One problem with using a single cord is that often margin areas are extremely thin and impressions can more easily deform. If the patient has an especially deep sulcus, using two cords prevents tissue from collapsing over the top of the cord. When packing the cords, pack a small cord directly below the margin of the tooth, and pack a larger cord directly on top of the small cord. The large cord is left in place for at least five minutes before being removed. You can then decide whether to remove the small cord before the impression is taken or to leave it in place.
The correct margin preparation and tissue management techniques are crucial to the entire process of fabricating and fitting a high-quality restoration, whether using a conventional or digital impression. DDS Lab has an excellent chart for improving your margins. This chart is available for download, and it is a great reference tool.
Our certified and experienced technicians are always available for case consultations and can assist you with case planning.
Click here to schedule a consultation with our technical team ›

References
https://www.dentaladvisor.com/pdf-download/?pdf_url=wp-content/uploads/2015/02/optimizing-margin-isolation.pdf
https://www.verywellhealth.com/gingival-retraction-cord-uses-and-characteristics-1059167
https://backerdentallab.com/digital-dentistry-how-to-get-the-best-margin-scan-with-your-ios/
https://burbankdental.com/digital-dentistry-tips-getting-best-margin-scan-using-ios/