An excellent quality dental impression is critical because the dental lab cannot fabricate accurate, well-fitting restorations without it. Before sending the impression to the lab, potential dental impression errors should be identified. Otherwise, work may be delayed if the impression is rejected.
If the work goes ahead, there is an increased risk of spending precious chair-side time adjusting it, or it might need to be remade entirely.
The most common dental impression errors include:
- Poor Tray Selection
- Inadequate Impression Material Mixing
- Surface Contamination
- Poor Margin Detail
- Internal Bubbles
- Marginal Tears
- Choosing the Wrong Impression Material
- Rushing the Impression
- Failing to Keep the Patient Still
1. Poor tray selection
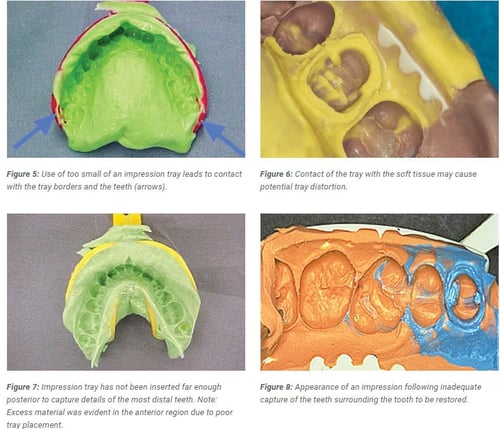
 The tray selected must capture the necessary information without distortion. It should be large enough to cover all the teeth without contacting the soft tissues. Once the impression is made, the tray should not show through.
Full arch trays are available in several sizes. The arch shape of trays varies according to the manufacturer, as some are more square while others are more rounded. When selecting a tray, make sure it is long enough to capture the entire arch and wide enough to allow adequate tray seating. Metal trays are modifiable and may be widened in the posterior regions, but modifications to the anterior portion of metal trays are trickier. Plastic trays can be modified using an alcohol torch to heat the plastic, adapting the flanges to fit the patient.
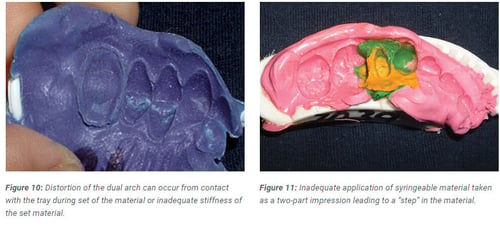
Dual-arch trays (triple trays) come in various widths, and it’s best to keep a selection in stock. When sizing a dual-arch tray, check the opposite side of the arch as the patient bites down on the empty tray. This will provide you with a good idea of how the occlusion should look while taking the impression. Also, it allows the patient to feel what they need to do and will help ensure they bite down correctly during the actual impression taking. It is helpful to provide a separate occlusal registration using rigid vinyl polysiloxane (VPS) material because wax bites tend to be less stable during transportation.
2. Inadequate impression material mixing
 When impression material is combined correctly, the color is uniform and without streaks. It’s more common to get streaking with hand-mixed putty materials, and hand-mixed materials should be kneaded quickly to ensure consistent color. Bleed the cartridge before attaching the automix tip when working with cartridge materials. This will ensure the catalyst and the base flow equally, avoiding issues with mixing. It is critical to use tray material and wash from the same manufacturer as they are chemically designed to work together. Using different materials could increase the risk of separation of the wash material from the tray VPS when the impression is poured-up in the dental lab.
3. Surface contamination
 Surface contamination can cause a tacky unset layer of impression material. It may be due to core build-up material, composites, or adhesives leaving a greasy coating on the tooth preparation. Any of these can prevent the material from setting correctly. Retraction cords and solutions containing aluminum chloride or ferric sulfate can transfer sulfur to critical areas, inhibiting the setting reaction of the marginal VPS material. Glove contact, rolling the retraction cord in gloved fingers, or using a rubber dam can have the same effect. Putty can become contaminated with latex when mixed by hand.
To prevent surface contamination, rinse the area with water or mouthwash once the rubber dam is removed and make sure it is thoroughly dried. After using hemostatic agents, ensure the preparation is vigorously washed to remove any residual debris and hemostatic agent. If gingival bleeding restarts, additional hemostatic can be burnished into the gingival sulcus to prevent further bleeding. Once bleeding has stopped, the prep is air-dried and ready for an impression. If the putty is mixed by hand, ensure gloved hands are washed, which will remove any residual surface sulfides and powder. Otherwise, choose powder-free or vinyl gloves.
4. Poor margin detail
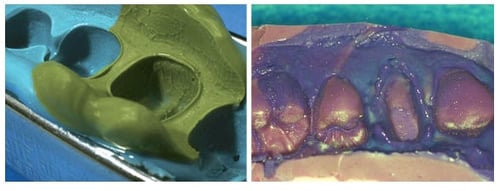
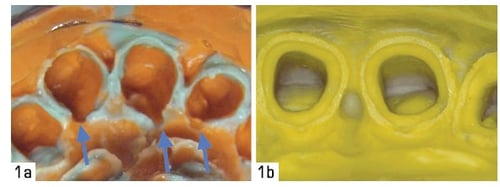 The margin is one of the most critical aspects of a dental impression. Without an accurate marginal impression, problems such as overhanging or open margins or an inadequately fitting restoration are more likely. Usually, voids at the margin are because of insufficient retraction or where fluid has accumulated, preventing the impression material from flowing around the margin.
Using retraction cords with syringeable hemostatics is the best way to solve this problem. One technique is to use a double retraction cord. Another approach uses retraction pastes placed into the gingival sulcus after preparation. A diode laser can help widen the sulcus and improve visualization of the prepared margin while achieving hemostasis.
5. Internal bubbles
 If moisture, including blood, water, or saliva, is trapped in the impression material, it can cause bubbles in the impression. These bubbles may be large enough to affect the luting agent, increasing the space to be filled. When the luting material is thicker, the restoration and tooth interface is weaker. Also, the prosthetic material could be thinner, increasing the risk of failure; this is especially critical when using all-ceramic materials, in which case a minimum thickness is vital. This problem can be solved by achieving hemostasis.
6. Marginal tears
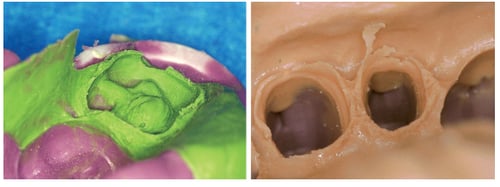 Marginal tears can occur when the wash material has insufficient tear strength. The strength of materials varies between manufacturers, and lower viscosity material is more likely to tear in the sulcus. When the sulcus is particularly deep, the wash material is thinner, and there is an increased risk that it will tear when removed. Also, removing the impression before the wash material is set could cause marginal tearing. If you need to remake an impression because of marginal tearing, make sure any remnants are removed from the sulcus and consider additional tissue retraction to widen the sulcus. Also, choosing a more viscous wash material could help to improve the quality of the impression.
7. Choosing the right impression material
Selecting the most suitable impression material is crucial for achieving an accurate and predictable impression. Usually, a sort setting time is preferable for your patient’s comfort; in any case, it is vital to know the working time for the material you have chosen. The impression must be inserted within the working time. If it is already set, it may not seat fully and will not capture the required details. Choosing a more hydrophilic material will help it adapt to the prepared tooth more easily, especially sub-gingivally and where fluid may be present.
8. Trying to rush the impression
It is crucial to take your time to make sure the details are correct (for example, packing the retraction cord). Ensure the cord is packed correctly and has retracted the tissue sufficiently. If you rush, the cord may not have enough time to sit, and it will do little other than traumatizing the area around the sulcus.
9. Failing to keep the patient still
Dental impressions can distort if the patient moves or begins to gag. One way to help keep the patient still is to chat with them; this will distract them, making them less likely to notice any discomfort. Keep reminding the patient to breathe through their nose. If they feel uncomfortable, wiggling their toes could help.
Our experienced technical team can offer advice on achieving more predictable and higher-quality impressions if you have questions.
Click here to schedule a consultation with our technical team ›

References:
https://www.dentalacademyofce.com/courses/3534%2FPDF%2F1804cei_Kurtzman_web.pdf
https://www.dentalproductsreport.com/dental/article/10-golden-rules-taking-impressions?page=0,1
Image source: https://glidewelldental.com/education/chairside-dental-magazine/volume-3-issue-1/identification-and-correction-of-common-impression-problems/