The phrase "the future of dental restorations" seems to appear with each new system that comes along. In the case of all-ceramic restorations, however, this statement may very well be true. Ever since the days of Dicor® and Cerestore® in the early 1980s, all-ceramic restorations have improved considerably.
Options now include pressable porcelain, porcelain to zirconia, CAD/CAM restorations and sub-classes of each that continue to be developed by many different manufacturers. With gold prices continually increasing, more dentists are starting to use all-ceramic materials over traditional PFM crowns. With so many all-ceramic choices, there are many details to remember when it comes to using each system.
Preparation is the Key
Surprisingly, preparation is probably the most overlooked aspect of an all-ceramic restoration. If proper tooth preparation is not followed, an otherwise successful restoration may fail, creating an unhappy patient, the need for additional chair time and higher costs for you. Remembering the following tips will help you achieve a successful restoration each and every time.
- Sharp Objects
Keep in mind that porcelain is basically glass. As such, avoid sharp angles, projections, pits or sharp transitions from one surface to the other when prepping for all ceramic veneers, inlays and crowns.
- Dry, Dry, Dry
The tooth preparation must be dry, but not desiccated to keep restorations from de-bonding.
- Know Your Parameters
Regardless of the manufacturer, almost all of the available all-ceramic systems adhere to similar parameters for reduction of tooth structure.
Parameters for Reduction of Tooth Structure on Fixed Restorations
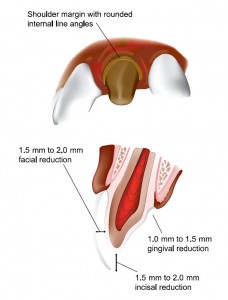
Anterior Crowns
1.0 mm - 1.5 mm reduction at the cervical
1.5 mm - 2.5 mm at the facial
1.5 mm - 2.5 mm at the incisal edge
A shoulder or deep chamfer margin is recommended and will give far better results than a featheredge or knife-edge preparation, which are contraindicated for both and posterior crowns.

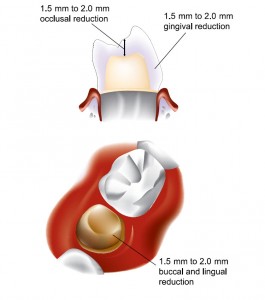
Posterior Crowns
1.0 mm - 1.5 mm reduction
1.5 mm - 2.0 mm occlusal surface
Again a shoulder or deep chamfer margin is highly recommended.

Veneers
0.3 mm - 0.5 mm at the cervical
0.5 mm - 0.6 mm at the labial
0.8 mm - 1.5 mm at the incisal
When possible, try to retain the original length at the incisal edge for the "extension" bevel. In addition, try to keep from breaking through the interproximals, leaving instead a smooth finish line. This will greatly aid in proper inter proximal contacts and will ensure a more natural looking restoration.
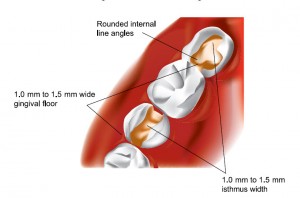
Inlays/Onlays
1.0 mm - 1.5 mm wide gingival floor
1.0 mm - 1.5 mm wide isthmus floor
1.0 mm - 2.5 mm depth from floor to cusp

Remember that these are all minimum requirements.
The more room the ceramist has to work with, the more natural the restoration will look.
- The surface of a veneer or all-porcelain restoration must be etched before bonding. In addition, unless the bonding agent has the coupling agent built-in, the tooth surface must be silanated.
- There is no benefit to bonding zirconia. Save the hassle and cement the restoration.
- Prescribe an occlusal guard after the fabrication of veneers to help prevent debonding due to aberrant occlusal forces at night. Precise attention to detail with regard to tooth preparation, cervical margin design and location, soft-tissue management, and impression-making are crucial to success.

Need an expert's advice? We're available for a consultation on your cases.
Call us at 877-337-7800.